• Skip to main content
  • Skip to footer

Holo Writing

Authors Jacob & H.P. Holo

  • Home
  • Books
    • Gordian Division
    • Monster Punk Horizon
    • Seraphim Revival
    • Monster Girl Tamer
    • Freelancers of Neptune
  • Audiobooks
  • About
  • Blog
  • Shop
  • Contact
  • Appearances
  • Free Book

Tabletop Games

Isekai Skies (Monster Punk Horizon #2) Cover Reveal!

August 9, 2021 by hpholo Leave a Comment

Last week, you saw a peek at Book 1 in my new GameLit adventure comedy series, Monster Punk Horizon. 😀

Now, since the second is going to crash-land soon after its release – a month, to be exact – here’s the cover reveal for Book 2! 😮

Cover art by Jackson Tjota

Isekai Skies (Monster Punk Horizon #2)


🌟 GameLit 🌟 Portal Fantasy 🌟 Adventure 🌟 Comedy 🌟


✨ Coming November 18th, 2021 ✨

Audio Release Date TBA

🐉🐉🐉

I Got Engaged and Ended Up in Another World!

An epic convention. An epic cosplay. An epic engagement. It was the best night of Kaito’s life—until the ground opened up beneath him.

Well, technically, a portal did. Either way, it sucked.

Now, trapped in another world with rampaging monsters, he’ll have to learn to survive. Fortunately, this world is conveniently similar to his favorite video game. And he’s got monster hunting experts (?) Pix and Jaz to show him the ropes.

With their help, he might last long enough to find a way home.

But if not, at least he’ll have fun hunting monsters before he dies!

Preorder Here!
Or Read a Sample of Book One Here!

Last week, you met my series protagonists Pix and Jaz, two girls who just want to hunt monsters and pay off their college loans. They were born and raised in the monster-dominated world under the Dazzling Skies, so named because its sky is taken up by thousands of glittering portals to other worlds, which constantly dump interesting loot and monsters for them to hunt –

And sometimes people for them to save.

Which makes the Dazzling Skies a perfect setting for an isekai story.

If you’re unfamiliar with the word – “isekai” is a Japanese term meaning “different world” and refers specifically to light novels and anime in which a character is transported from their familiar world into a fantasy world, often with distinct video game trappings.

I was indifferent to the isekai genre when I first encountered it several years ago, but as the genre developed and began to play with and parody its own tropes, I grew to love it – especially Overlord, The Rising of the Shield Hero and – I kid you not – Reborn as a Vending Machine, Now I Wander the Dungeon (Review here, btw! 😀).

And, while I hadn’t set out to write isekai stories at the inception of this series, I quickly realized that the basic structure of the world I’d set up lent itself well to such stories. This structure, in turn, would allow me to show the bizarre world of the Dazzling Skies from an outsider’s perspective.

Book 2‘s protagonist, Kaito, is from a strange world himself – a far-future version of our world where everyone has hyper-advanced biotech altering their perception of reality, and where a particularly angry breed of cow changed the course of history – but the world under the Dazzling Skies is far stranger than anything he’s ever encountered. Though, fortunately for him, it does share some similarities with his favorite Immersive Video Game series … 😉

Isekai Skies (Monster Punk Horizon #2) is set to release on Kindle Unlimited this November, and is already available for preorder.

And again, if you’d like to be one of the lucky people to read it early, be sure to join the Pug Scouts – our VIP Street Team! 😀 I’ll be sending out eARCs soon, and all you have to do in exchange for your free book is post a review once the book is live!

Join Our Street Team Here!

In the meantime, keep your eyes on the blog next week for the cover reveal of Monster Punk Horizon #3!  😀

***

Note: Holo Writing is a participant in the Amazon Services LLC Associates Program and, as such, may earn a small commission from any product purchased through an affiliate link on this blog.

Filed Under: Holo Books Tagged With: adventure, Anime, Another World, coming soon, Different World, fantasy adventure, GameLit, H.P. Holo, isekai, light novels, LitRPG, Monster Hunter, Monster Hunter Rise, Monster Hunter World, Monster Punk Horizon, New Series, Pokemon, Portal Fantasy, Tabletop Games

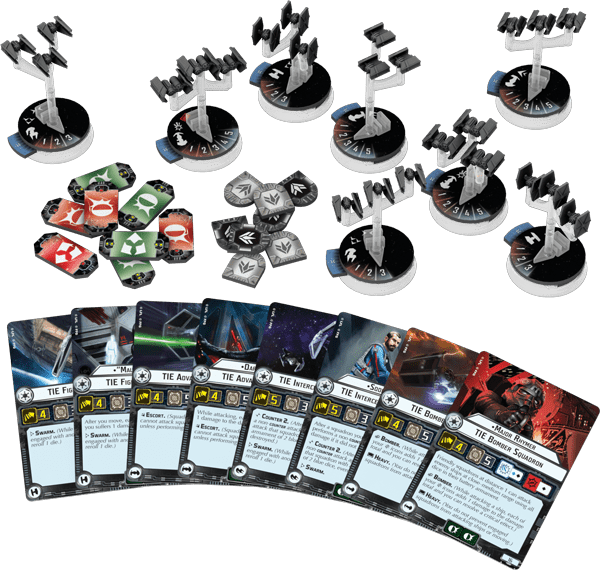
Star Wars: Armada – Character TIE Squadron Tactics

July 24, 2015 by holojacob Leave a Comment

Squadrons provide an important supplement to the capital ships of Star Wars: Armada. As of Wave 1, the Imperial Navy has four basic squadrons and five character squadrons to choose from. Today, let’s take a look at what the character TIE squadrons have to offer.
IN SHORT: Tougher and harder hitting than regular TIE squadrons, character squadrons open up an intriguing set of abilities for Imperial commanders.
“HOWLRUNNER” TIE FIGHTER SQUADRON: Howlrunner is a straight up force multiplier. She makes any friendly squadron with the Swarm rule at distance 1 better by granting 1 additional blue die for attacks against enemy squadrons. Also note that this includes the Counter rule TIE Interceptors have, increasing their already ridiculous attack power even more and making opponents think twice before shooting at them.
Because Howlrunner makes everything around her better, she can quickly tip the scales in larger engagements, but that power also her makes her a choice target. Even though TIE Advanced Squadrons do not benefit from her ability, it can often be advantageous to fly one with her TIE swarm to provide some insurance.
Star Wars Armada Howlrunner Star Wars Armada tie-advanced-squadron Star Wars Armada TIE_Fighter_Squadron
Brace and Scatter defense tokens are great, but accuracy results can negate them, and Howlrunner only has 3 hit points. Still, for 16 points, Howlrunner is an excellent investment in lists with large numbers of TIE Fighters and Interceptors.
“MAULER” MITHEL TIE FIGHTER SQUADRON: Mauler is kind of like Howlrunner in reverse. Whereas Howlrunner wants to hang out with a group of friendlies, Mauler wants to get stuck in with clusters of enemy squadrons. His ability grants automatic damage after he moves, inflicting 1 point of damage to any squadron he is engaged with.
Of course, moving into a big group of enemy fighters isn’t always the smartest idea, and Mauler can’t move while he’s engaged. Fortunately, Imperial players have the tools necessary to give Mauler the support he needs.
TIE Advanced really shine in the protection role, sopping up damage that would otherwise pound Mauler to dust. And Admiral Chiraneau on a nearby ship can permit Mauler to move even while engaged, allowing players to get the most out of his automatic damage ability.
Star Wars Armada Mauler-mithel Star Wars Armada tie-advanced-squadron Star Wars Armada Admiral_Chiraneau
Mauler is a high risk / high reward character squadron and needs adequate support to really shine, but there’s no denying he can inflict a lot of damage when used right. Not bad for 15 points.
SOONTIR FEL TIE INTERCEPTOR SQUADRON: It’s bad enough taking damage from TIE Interceptors just for attacking them. Well, Soontir Fel does this and inflicts damage for not attacking him. Seriously, opponents should just get used to taking damage around this guy no matter what they do. Add in the Brace and Scatter defense tokens, and Soontir Fel becomes very frustrating to take down.
TIE Advanced Squadrons can even be used to force the automatic damage. As long as Soontir Fel is engaging that enemy, they will suffer 1 automatic point of damage whenever they attack the TIE Advanced. The only downside here is the TIE Advanced doesn’t share Soontir Fel’s blistering top speed of 5, which could restrict players under some conditions.
TIE Interceptor or TIE Fighter Squadrons also provide a nice bonus to Soontir Fel by triggering his Swarm rule and benefiting from it themselves. This is even more effective for Soontir Fel because of the combination of Counter of defense tokens. Under normal conditions, Soontir Fel will be dishing out plenty of Counter attacks, and having an extra reroll in those attacks is definitely a nice bonus.
Star Wars Armada Soontir-fel Star Wars Armada tie-advanced-squadron Star Wars Armada TIE_Interceptor_Squadron
Soontir Fel will inflict damage in just about any combat situation, forcing your opponent to make uncomfortable decisions. That’s not a bad ability for 18 points.
DARTH VADER TIE ADVANCED SQUADRON: Vader is all about dishing out and soaking up damage. With the critical symbol counting as regular damage on his attacks and an additional black die in his anti-squadron attack, Vader can inflict a ton of pain. Note, however, that he does not cause critical effects to trigger.
When targeting enemy squadrons, he will easily out-damage even TIE Interceptors, and his anti-ship attack is on par with TIE Bombers, minus the critical effect.
With 5 hit points and 2 Brace tokens, Vader isn’t going down easily. However, his Escort ability, shared with all TIE Advanced, is something of a mixed blessing. While it does mean Vader can be an effective meat shield for someone else, it also means that regular TIE Advanced Squadrons can’t protect him.
Star Wars Armada Darth-vader
At 21 points, Vader is a very hefty investment for a squadron that is designed to be shot at first. However, his resilience and damage output certainly make him a viable alternative to regular TIE Advanced Squadrons.
MAJOR RHYMER TIE BOMBER SQUADRON: Rhymer is an incredible force multiplier for bombers. Any friendly squadron at distance 1 may attack ships at close-medium range. This is a huge boost in range, and the fact that Rhymer dishes it out to anyone near him makes him a flexible addition for Imperial players.
Also note that Rhymer’s ability does not have any restrictions like Howlrunner’s does. His range increase is not restricted to craft like TIE Bombers, though undoubtedly squadrons with the Bomber rule receive the most benefit. After all, swarm of TIE Fighters can do a surprising amount of damage to an enemy capital ship as all those blue dice start to add up, and Rhymer helps get those hits in.
The range increase has other benefits, too. Bombers rely heavily on Squadron commands, particularly against the faster and more maneuverable capital ship types. However, with the wide strike envelope afforded by Rhymer, bombers have a much greater chance to target enemy ships without moving.
Star Wars Armada Rhymer Star Wars Armada tie-advanced-squadron Star Wars Armada tie-bomber-squadron
Like most character squadrons, Rhymer can take advantage of a TIE Advanced wingman, but in this case, Rhymer helps out the TIE Advanced as well, extending the range of its black die for anti-ship attacks. He also comes stock with 5 hit points and two Brace tokens, making him a tough proposition to take down. Honestly, his only downside is his lackluster anti-squadron attack.
All this for only 16 points? Yes, he really is just that awesome.
POWER DENSITY: Okay, so regular TIEs are great bargains when you look at their stats in a point for point comparison to the stats of character squadrons. Standard TIEs are potent little troublemakers, especially stock TIE Fighters and Bombers. However, there’s a second side to this discussion, and that is Squadron commands.
The big disadvantage for forces that rely heavily on standard squadrons is the need for higher Squadron values and/or more Squadron commands to get the same mileage from his or her TIEs. I like to call this attribute “power density,” and it’s definitely an advantage that swings in favor of characters squadrons.
2 TIE Fighter Squadrons put out more damage than Howlrunner, but then, they also require twice the Squadron value to get the jump on the enemy. That’s the hidden cost at work. Sure, stock TIEs are cheap, but they also require plenty of love from their capital ships to be the best they can be.
LISTS FOR FUN: How about a look at a list heavy with characters squadrons? Let’s take a look at the Admiral Motti’s Flying Aces.
Victory I-class Star Destroyer (73)
– Admiral Motti (24)
– Admiral Chiraneau (10)
– Flight Controllers (6)
Gladiator II-class Star Destroyer (62)
Soontir Fel TIE Interceptor Squadron (18)
Darth Vader TIE Advanced Squadron (21)
“Mauler” Mithel TIE Fighter Squadron (15)
TOTAL: 291 points
First, the Victory will be dishing out a generous quantity of squadron commands to support the three character squadrons. Let’s take a look at how that plays out.
Things start off with enemy squadrons taking damage when Mauler shows up (and he can always get that move if needed because Admiral Chiraneau is on board the Victory). Then the enemy takes some more damage when Mauler, Soontir, and Vader unload, and since both Mauler and Soontir have Swarm, they enable each other’s rerolls. Plus Flight Controllers are along for the ride because who doesn’t like TIEs with an extra blue die per attack?
Also, two Gladiators are included, upgraded to Gladiator II’s, for fire support against enemy squadrons as well as general anti-ship destruction. Because while these three aces are awesome, a little help is in order from the capital ships. Then once your opponent finally gets around to attacking your squadrons, Darth soaks up the damage while Soontir inflicts automatic damage on anyone who attacks.
Is it ideal? Probably not, but should be fun, and isn’t that the point? 🙂
SUMMARY: Some bring pure and simply destruction, while other grant huge benefits to nearby friendly squadrons. Either way, there’s no denying that TIE character squadrons are a diverse and powerful group with plenty to offer any Imperial commander.
Check out the complete list of Star Wars: Armada articles here.

Filed Under: Star Wars: Armada Tagged With: Fantasy, Fantasy Flight Games, Science Fiction, Star Wars, Tabletop Games, TIE Advanced Squadron, TIE Bomber Squadron, TIE Fighter Squadron, TIE Interceptor Squadron

Star Wars: Armada – TIE Squadron Tactics

July 3, 2015 by holojacob 1 Comment

Imperial-Squadrons-Layout-3-cards
Squadrons provide an important supplement to the capital ships of Star Wars: Armada. As of Wave 1, the Imperial Navy has four basic squadrons and five character squadrons to choose from. Today, let’s take a look at what the standard TIE squadrons have to offer.
IN SHORT: Cheap, fast, and more specialized than Rebel squadrons, TIEs provide a versatile set of cannon fodder to throw at your opponents.
TIE FIGHTERS: At 8 points each, TIE Fighter Squadrons are incredibly affordable and can form effective screening forces with minimal investment. With speed 4, TIE Fighters can easily get the drop on the often slower enemy squadrons. They also pack impressive anti-squadron punch for their points.
3 blue dice allow them to tear through enemy squadrons rapidly, and the Swarm rule only makes this better. With nearby friendly squadrons engaging the enemy, they can reroll a single die. This potent anti-squadron ability can be further supplemented with Howlrunner and/or Flight Controllers for up to 5 blue dice (with a single reroll) per squadron.
Star Wars Armada Howlrunner Star Wars Armada Flight_Controllers Star Wars Armada TIE_Fighter_Squadron
And don’t discount TIE Fighters when it comes to engaging enemy ships. True, they only have a single blue die to attack with, but that’s 1 blue die … per 8 points! Attacks like that can add up quickly.
So what’s the downside?
Well, TIE Fighters may put out a ton of anti-squadron damage, but they go down fast. With only 3 hit points, they’re easily focused down during a single round of combat. It also doesn’t help that the Swarm rule and Howlrunner both encourages them to bunch up. Enemy ships with strong anti-squadron batteries should be rightly feared, as they will quickly whittle TIE clusters to dust.
Easy come, easy go.
TIE INTERCEPTORS: At 11 points, TIE Interceptors act like TIE Fighters on steroids. They boast a blistering top speed of 5 and come with anti-squadron armaments of 4 blue dice. Like TIE Fighters, they benefit greatly from Swarm, but also come with Counter.
Thanks to the Counter rule, TIE Interceptors get to fire 2 blue dice at enemy squadrons attacking them, and these counter attacks benefit from both Howlrunner’s ability and Swarm, giving them a potential Counter 3 with a single reroll. Ouch!
Star Wars Armada Howlrunner Star Wars Armada TIE_Interceptor_Squadron
TIE Interceptors are a powerful, dedicated anti-squadron force, and their Counter ability can make them highly challenging for bombers like Y-Wings and TIE Bombers to handle. Like TIE Fighters, they also combine extremely well with Flight Controllers. But they are also incredibly frail. In fact, point for point, they are the frailest squadron type in the game as of Wave 1. Swarms of interceptors do not like taking fire from a capital ship’s arc, and it should also be noted that, by the very nature of them having Counter, opponents are more likely to engage TIE Interceptors with capital ships instead of squadrons, when possible.
TIE ADVANCED: Weighing in at a cost of 12 and coming with a hefty 5 hit points, TIE Advanced squadrons are a welcomed bit of durability in the TIE lineup. And a good thing too, because they also come with Escort, forcing opponents to target them first. This combination makes them superb wingmen for named squadrons like Howlrunner or Rhymer.
Star Wars Armada Rhymer Star Wars Armada tie-advanced-squadron
Their single black anti-ship die and 3 blue anti-squadron dice are respectable, as is their speed value of 4, but TIE Advanced Squadrons are quickly outclassed in damage output by other Imperial offerings. TIE Fighters and Interceptors will shred enemy squadrons, and TIE Bombers can quickly pack on the hurt against enemy ships.
In the end, they’re meat shields. Their best uses are defensive, not offensive, either protecting a critical named squadron or slugging it out with bombers trying to get to a capital ship.
TIE BOMBERS: Featuring a black anti-ship die and the Bomber rule (allowing them to inflict critical hits against enemy ships), the role of TIE Bombers Squadrons is clear. With a cost of only 9 points and speed 4, they’re cheap and surprisingly swift for bombers, a trait that can be exaggerated even more with the Corruptor title on a Victory-class Star Destroyer for even more speed. Throw Rhymer into the mix to allow TIE Bombers to attack at medium range instead of range 1, and suddenly these squadrons can strike targets at considerable distances.
Star Wars Armada Corrupter Star Wars Armada Rhymer Star Wars Armada tie-bomber-squadron
On average, a single TIE Bomber will inflict 1 point of damage against an enemy ship per attack with a 25% chance of a critical effect. This is made even nastier because it’s difficult to use defense tokens against them. Brace can only trigger if the TIE Bombers get a double hit, Evade isn’t going to do anything at range 1 unless Mon Mothma is commanding the Rebel forces, and Redirect can only shift a point or two of damage at a time.
TIE Bombers are utterly devastating when they get into range of enemy capital ships. But there is, of course, a downside. They also come with the Heavy rule, which means they cannot engage enemy squadrons. TIE Bombers may come with a plenty of hit points to absorb attacks, but their effectiveness as a screening force is zero. Secondly, they have the weakest anti-squadron attack in the game: a single black die.
(Capital ships with a single blue die shouldn’t be counted as the weakest because they can strike multiple targets at once.)
LISTS FOR FUN: Want to give a squadron-heavy list a whirl? Try Grand Moff Tarkin’s Flying Circus.
Victory I-class Star Destroyer (73)
– Grand Moff Tarkin (38)
– Flight Controllers (6)
– Expanded Hangar Bay (5)
Victory I-class Star Destroyer (73)
– Corruptor Title (5)
– Admiral Chiraneau (10)
– Expanded Hangar Bay (5)
TIE Fighter Squadrons x 5 (40)
TIE Bomber Squadrons x 5 (45)
TOTAL: 300 points
Okay, it may be 300 points, but it’s easy enough to trim an upgrade or squadron (or even substitute out Tarkin) to price it for an effective initiative bid. The basic idea is that each Victory can activate up to 5 squadrons per round (base 3 + Expanded Hangar Bay + Squadron tokens from Tarkin). And by doing this, they maximize the use of their squadron friendly upgrades.
Flight Controllers can turn those 5 TIE Fighters into squadron mulching machines, spitting out a combined total of 20 blue dice (with up to 5 rerolls). And with the Corruptor title and Admiral Chiraneau, those TIE Bombers are going to be speed 5 normally and can easily escape at speed 3 if they get engaged.
SUMMARY: TIEs, ladies and gentlemen. Fast, hard-hitting, and dirt cheap. Just don’t get too attached to them, because they tend not to last long. 🙂
Check out the complete list of Star Wars: Armada articles here.

Filed Under: Star Wars: Armada Tagged With: Fantasy, Fantasy Flight Games, Science Fiction, Star Wars, Tabletop Games, TIE Advanced Squadron, TIE Bomber Squadron, TIE Fighter Squadron, TIE Interceptor Squadron

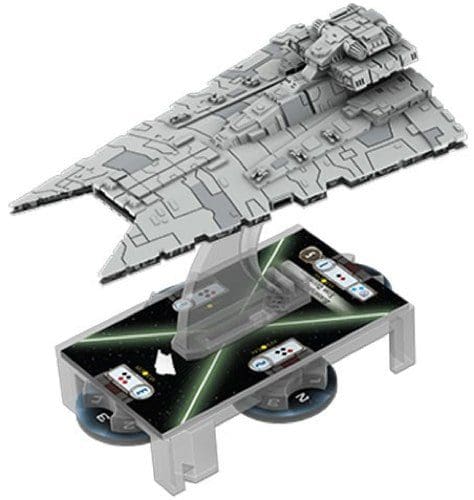
Star Wars: Armada – Gladiator-class Star Destroyer Tactics

June 15, 2015 by holojacob Leave a Comment

Star-Wars-Armada_-Gladiator-Class-Star-Destroyer
Capital ships form the critical foundation of any Star Wars: Armada fleet. As of Wave 1, the Imperial Navy has two excellent capital ships to choose from. Today, let’s take a look at the Gladiator-class Star Destroyer.
IN SHORT: With good speed, surprising maneuverability with the right upgrades, and a devastating close range punch, the Gladiator is a deadly addition to the Imperial fleet.
STRENGTHS: How about 4 black dice firing out of the left and right arcs? That’s the first thing anyone should notice about the stock Gladiator I. And if it isn’t, then it will probably be made clear when the Gladiator unloads at close range. On average, that’s 4 damage inflicted out of each attack. Start adding in Concentration commands and/or upgrades, and the Gladiator’s damage output can become ridiculously high.
The Gladiator is also a remarkably well-rounded package. It comes with 1 token each for Evade, Brace, and Redirect, giving it a defensive mechanic for just about any situation. It can turn 2 clicks at speed 1, allowing it to execute some very tight turns. 2 Command allows it to react reasonably quickly to the ebb and flow of battle, and 2 Squadron and 3 Engineering are nothing to sneeze at either.
The upgraded Gladiator II exchanges 1 of its black dice on each side for reds and enhances its anti-squadron batteries to 2 blue dice. This gives it an overall boost in versatility while lessening its broadside punch just a little for only 6 points. With generously wide side arcs, the Gladiator II is well suited to assisting TIE squadrons with sprays of blue dice.
It even comes with 2 forward facing red dice (augmented with 2 more black dice) for chipping away at enemies while on approach. Oh, yes. I like this ship.
WEAKNESSES: When it starts receiving hits, the Gladiator-class Star Destroyer is no Victory. A Gladiator II costs 62 points, only 11 below a base Victory I, but it won’t survive enemy fire nearly as long. 5 Hull Points are still respectable, but caution should be used to ensure the Gladiator is supported by the rest of your fleet and not blindly charging ahead of it.
It’s also not much more than a nuisance at anything outside close range. Sure, black dice are awesome, but only when you actually get to roll with them. Fortunately, there are a few options available to the Gladiator to help with this problem.
With the dirt cheap Insidious title (only 3 points), a Gladiator can use black dice at medium range. The catch? It can only use this ability when firing into an enemy ship’s rear hull zone. Not the easiest thing to achieve, but certainly not out of the question for an appropriately upgraded Gladiator (see combos below).
Star Wars Armada Insidious
With the Demolisher title, a Gladiator gains the incredibly potent ability to perform one of its attacks after a maneuver. Given the general need to get in tight, this upgrade provides the Imperial player with considerable flexibility over every other ship that must shoot first and then move.
Star Wars Armada Demolisher
COMBOS: Gladiators like to fly in close and personal to deliver all those black dice to the enemy’s face. Good thing they have some handy upgrades to help them get there.
With Engine Techs, a Gladiator can execute an extra speed-1 maneuver after its regular maneuver with the use of a Navigate command (either dial or token). This is especially good on the Gladiator because its speed-1 maneuver has 2 clicks, resulting in a potential 4 or 5-click turn. Toss in Wulff Yularen with his ability to copy a token once per round, and 1 Navigate token at the start can last the entire game.
Star Wars Armada Engine-techs Star Wars Armada Wulff_Yularen
You can even throw the Demolisher title into this mix. A base Gladiator I with these upgrades starts to get a bit bloated at 81 points, but it can undoubtedly get where it needs to go and unload a fist full of black dice when it gets there. Not bad at all.
Star Wars Armada Engine-techs Star Wars Armada Wulff_Yularen Star Wars Armada Demolisher
And speaking of those black dice, the Assault Concussion Missiles upgrade can make them even meaner. On a black critical, both adjacent hull zones take 1 point of damage. Granted, you can only have one critical effect per attack, but the big advantage is this effect doesn’t need to hit the hull to trigger. It works just as well on shields, too. Take Admiral Screed as your commander, force those critical hits when you don’t actually roll them, and watch the damage pile up.
Star Wars Armada Assault-Concussion-Missiles Star Wars Armada Admiral-Screed
LISTS FOR FUN: Here’s a little list I like to call Admiral Screed’s One-Two Punch.
Victory II-class Star Destroyer (85)
– Admiral Screed (26)
– Overload Pulse (8)
Gladiator I-class Star Destroyer (56)
– Demolisher (10)
– Engine Techs (8)
Gladiator II-class Star Destroyer (62)
TIE Fighter Squadrons x 5 (40)
TOTAL: 295 points
The idea here is to utilize Screed’s penchant for critical hits by deploying two effects in a combination. Pick a target that’s in range of the Victory and is close to the Demolisher. The Demolisher should either have a Navigate token saved up or a Navigate dial ready to reveal.
Activate the Victory first and trigger an Overload Pulse critical hit on the unlucky target, exhausting all of the ship’s defense tokens. Then move and shoot with the Demolisher and pummel the now helpless target with black dice. Even if the target activates in between, the Demolisher’s move and shoot, plus the Navigate command, plus Engine Techs should give you the flexibility to get an arc on the target. After that, they’ll either take the hit on the chin or start discarding defense tokens. Either result is good for you.
I’ve shown the remaining points spent on TIE Fighters and a second Gladiator (upgraded to a type II for extra anti-squadron firepower), but there are plenty of other ways to spend those remaining points. I just naturally prefer to keep my upgrades frugal and my ship count high. 🙂
SUMMARY: Ladies and gentlemen, the Gladiator. One lean, mean short range brawler.
TRIVIA: Did you know that the Gladiator is not a new Imperial ship? In fact, it’s a very old Imperial design dating back to the Star Wars: Droids cartoon series from 1985. Check this out!
Star Wars Droids Cartoon Demolisher
Oh, and here’s Admiral Screed, too!
Star Wars Droids Cartoon Admiral Screed
Check out the complete list of Star Wars: Armada articles here.
***
Note: Holo Writing is a participant in the Amazon Services LLC Associates Program and, as such, may earn a small commission from any product purchased through an affiliate link on this blog.
 

Filed Under: Star Wars: Armada Tagged With: Fantasy, Fantasy Flight Games, Gladiator-class Star Destroyer, Science Fiction, Star Wars, Tabletop Games

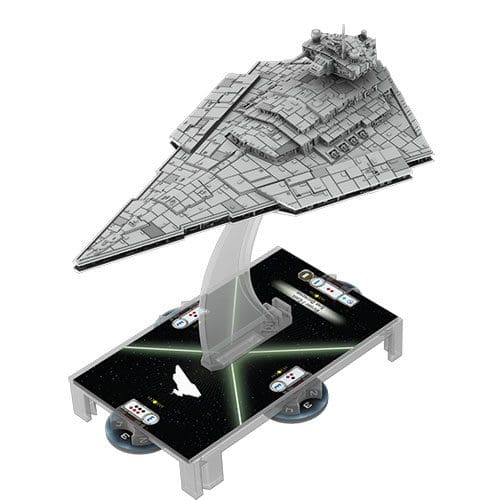
Star Wars: Armada – Victory-class Star Destroyer Tactics

June 7, 2015 by holojacob 2 Comments

star wars armada victory-class
Capital ships form the critical foundation of any Star Wars: Armada fleet. As of Wave 1, the Imperial Navy has two excellent capital ships to choose from. Today, let’s take a look at the Victory-class Star Destroyer.
IN SHORT: It may be slow and take an entire game just to turn around, but do not underestimate the Victory’s resilience or its frontal attack power. It will take its lumps and then smash the enemy’s face in.
STRENGTHS: With 8 Hull, plentiful shielding, and 2 Redirect tokens, the Victory can easily sop up massive damage before going down. Ignoring any special rules, a frontal assault against a fresh Victory must inflict an astounding 17 points of damage to blow it up (3 shields from the front, left, and right hull facings plus those 8 Hull points). Add in a Brace token, and the Victory is sticking around for a while, during which it can generate 2 shield points each turn with an impressive Engineering value of 4.
Considering this fortitude, the Victory’s base price of 73 points is an absolute steal. Point for point, it is the most resilient ship in the game as of Wave 1.
The Victory also sports a wide and very deadly front firing arc with 6 attack dice (3 reds and 3 more either black or blue depending on the variant). Seriously, who wants to be on the receiving end of that kind of firepower? It also comes equipped with a minimum of 2 red dice in every arc, ensuring that if the enemy can target the Victory, the Victory can fire back.
WEAKNESSES: Sure, the Victory is great at going head-to-head with opposing ships. It’s when faster enemies start maneuvering around to the sides and back that things get dicey. With its top speed at a puttering 2 and only 1 maneuvering click before Navigate commands are considered, the Victory is very much the slow, plodding behemoth.
To make a bad situation worse, its rear hull zone is a clear blind spot. With only 1 shield and 2 red dice, ships that get in behind the Victory or even manage to flank it are very difficult to dislodge.
Also, while it has red dice in every arc, its lack of Evade tokens means it is at a defensive disadvantage in any prolonged long-range engagement. Opponents with Evade tokens can ignore select die results, but the Victory must take every hit on the chin, and those hits will add up despite its raw resilience.
Fortunately, the Dominator title is a good (if expensive) way to help deal with these problems, giving one Victory per list the option of firing an extra two blue dice in any of its arcs. A nasty surprise to be sure, but one that costs 12 points and consumes shield energy with each blue die fired.
Star Wars Armada Dominator
COMBOS: The Victory can be kitted out in a huge variety of configurations, but my favorite application is squadron support. With a base Squadron value of 3 and the ability to take the Expanded Hangars upgrade, the Victory is a clear choice for getting the most out of Imperial TIEs. Add in Grand Moff Tarkin dishing out command tokens, and a single Victory can easily support 5 squadrons per round.
Star Wars Armada Expanded-hangar-bay Star Wars Armada Grand-moff-tarkin
This ability is extremely valuable for Imperial fleets because of the lower cost of basic TIE squadrons when compared to Rebel counterparts. In general, it takes a higher Squadron value to make Imperial fighters as effective as Rebels fighters.
Fortunately, the Victory can be customized for a variety of squadron support roles. Combining its already high Squadron value with Expanded Hangars and Flight Controllers gives any TIEs a huge edge in anti-squadron combat. Plus 1 blue dies for everyone? Yes, please!
Star Wars Armada Expanded-hangar-bay Star Wars Armada Flight-controllers
And let’s not forget the love a Victory can dish out to bombers. With Admiral Chiraneau onboard a Victory with the Corruptor title, enemies will find it very challenging to pin down your bombers. Even if engaged, they’ll still be able to move distance 3 when activated!
Star Wars Armada Expanded-hangar-bay Star Wars Armada Admiral_Chiraneau Star Wars Armada Corrupter
LISTS FOR FUN: Victory’s are tough, right? And Admiral Motti makes ships even tougher … so here comes Admiral Motti’s Meat Lovers Pizza!
Victory I-class Star Destroyer (73)
– Admiral Motti (24)
Victory I-class Star Destroyer (73)
TIE Fighter Squadrons x 7 (56)
TOTAL: 299 points
Star Wars Armada Admiral-mottiIt may not be the flashiest list out there, but 3 stock Victory I-class Star Destroyers flying under Admiral Motti means your opponent has a terrifying 30 Hull Points to chew through. That’s a lot of meat on those pizza slices, and that kind of damage is simply not going to happen in most games. Plus, with triple front firing arcs of doom instead of 1, the Victory’s can be positioned to help defend each other’s blind spots, mitigating (to a certain degree) their largest flaw.
After adding the meat, garnish the list to taste with squadrons (I chose TIE Fighters, but it’s really a matter of preference) and take objectives as you see fit.
7 TIE Fighter Squadrons (6 for a more aggressive initiative bid) provide significant anti-squadron firepower to cover the Victory’s from bombers, and the Victory’s come equipped with more than adequate Squadron values to keep those TIEs running at their peak. 7 squadrons won’t stop a determined enemy squadron push, but all they really have to do is dampen it so that the Victory’s can handle whatever gets through.
And besides, playing 3 star destroyers in one list is just plain fun. At the end of the day, isn’t that the point? 🙂
SUMMARY: The Victory may not be the fastest ship or the prettiest ship (far from it on both accounts), but it is a rock solid workhorse for the Imperials and is currently the safest place to put our commanders. This article merely scratches of what the Victory can do on the tabletop.
Check out the complete list of Star Wars: Armada articles here.
***
Note: Holo Writing is a participant in the Amazon Services LLC Associates Program and, as such, may earn a small commission from any product purchased through an affiliate link on this blog.

Filed Under: Star Wars: Armada Tagged With: Fantasy, Fantasy Flight Games, Science Fiction, Star Wars, Tabletop Games, Victory-class Star Destroyer

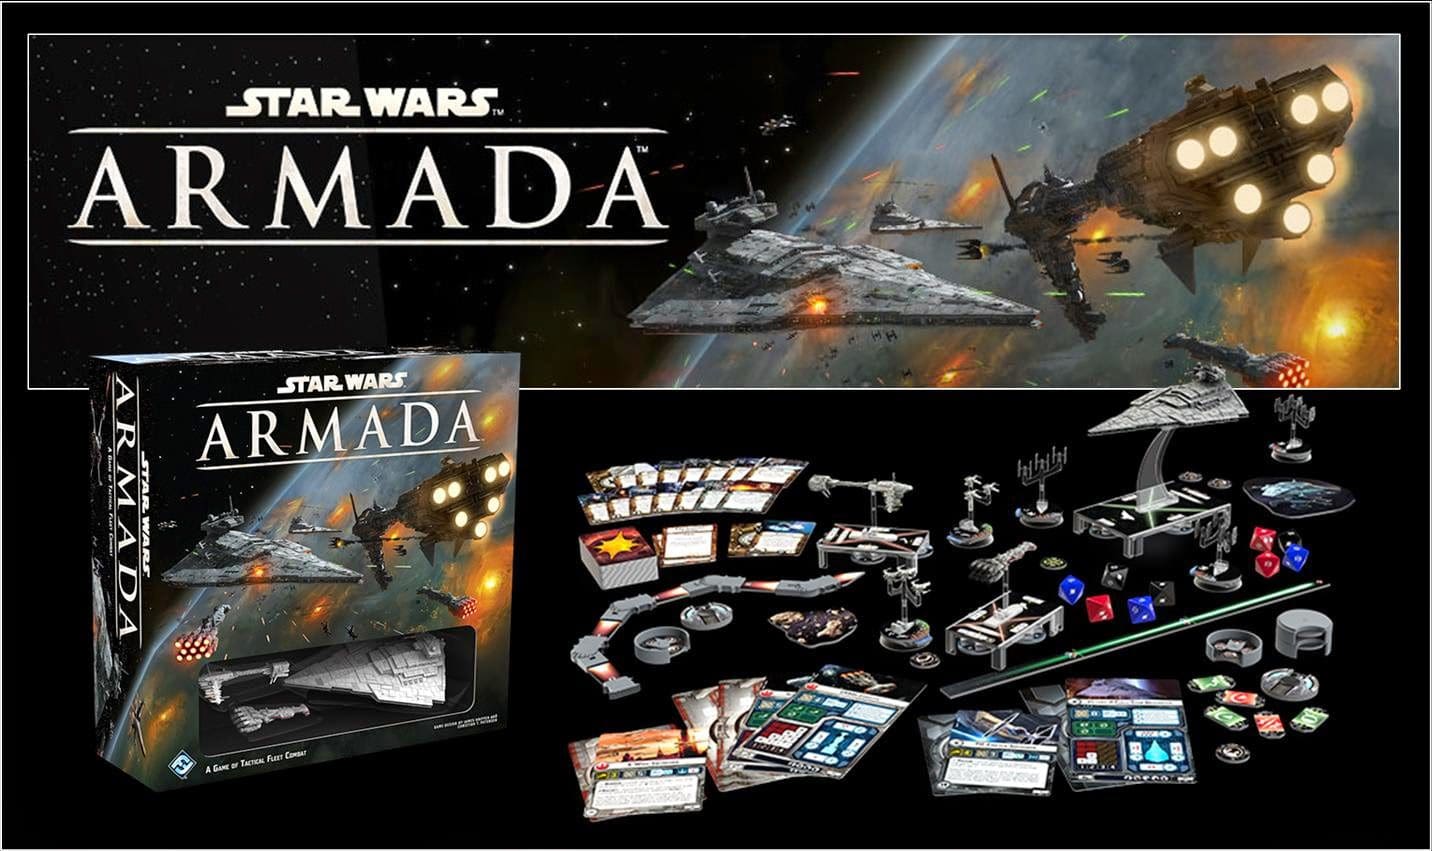
Star Wars: Armada – Core Set Review

April 19, 2015 by holojacob Leave a Comment

Star Wars Armada
IN SHORT: Fantasy Flight Games has just released the Core Set for their new table top game – Star Wars: Armada. Here are my first impressions and thoughts on the core units.
GENERAL: The game itself focuses on the big picture, namely two fleets of capital ships battling it out while the fighters and bombers take a far smaller (though still important) role. The game has a wonderful sense of momentum to it. Capital ships navigate slowly. Orders take multiple turns to execute. The ships are massive behemoths that take time to react to changing circumstances, and this is represented very well in the game mechanics.
Star Wars: Armada also strikes that sweet spot between being pick-up-and-play friendly and a possessing a lot of depth hidden beneath the surface. Despite the limited amount of ships and upgrade cards, I was surprised by the number of options available for configuring my Victory-class Star Destroyer. (I played Imperial for all my games so far. My affinity for awesome villains remains unchanged. 🙂 )
Next, here’s what I thought of the ships and cards in the Core Set.
Grand Moff Tarkin: Every fleet needs a commander, and Tarkin is the only Imperial commander in the Core Set. But, wow, what an ability! The guy dishes out command tokens like candy, imparting a huge level of flexibility to the otherwise lumbering Victory-class Star Destroyer. Command tokens may not be as powerful as command dials, but Tarkin hands them out exactly when you need them instead of being forced to predict what you’ll need three turns down the road. But at 38 points, you pay a premium price for this ability. He’s almost the same cost as a base CR90 Corvette.
Victory-class Star Destroyer: This thing is a beast to take down. With 8 Hull, 4 Engineering, 2 Redirect defense tokens, a Brace defense token, and plenty of shielding, the Victory is not going to fall quickly to anything. Tarkin just makes a tough ship even tougher, since the command dials and tokens can be combined to even greater effect, giving the Victory a potential +3 shields every turn if the Imperial player decides to turtle up.
It also has a powerful front arc with 6 attack dice. However, the Victory’s biggest vulnerability is its rear arc, which only has 1 shield and 2 attack dice. With speeds that go from slow to slightly less slow, the Victory is in trouble if an enemy ship slips in behind it and can stay there.
TIE Fighter Squadrons: Cheap anti-squadron covering units. You want your Victory focused on the other capital ships, and TIE Fighter Squadrons are an excellent way to keep those X-Wings from pecking the Victory to death. They’re low cost-to-squadron ratio does have disadvantages, though, since squadrons really need squadron commands from capital ships to be at their most effective.
“Howlrunner” TIE Fighter Squadron: For the price of 2 TIE Fighter Squadrons, the Imperials can take this elite squadron. Howlrunner is a force multiplier, giving any friendly squadron with the Swarm rule (which TIE Fighters have), an additional blue attack die when they attack an enemy squadron. This allows a good TIE formation to absolutely shred enemy fighters. She also comes with defense tokens, so even though her TIE is a piece of flying confetti, it’s a hard to hit piece of flying confetti.
That being said, Howlrunner encourages the TIEs to clump up even more than they already do (again, thanks to that Swarm rule), which can leave them vulnerable to attacks from ships with decent anti-squadron abilities like the Nebulon-B Escort. A spray of 2 blue attack dice at every TIE squadron in one of its arcs is not a pretty thing to see.
General Dodonna: Like the Imperials, the Rebels only get one commander in the Core Set. At about half the price of Tarkin, he’s not quite as impressive. Where Tarkin provides a steady stream of benefits over the course of the game, Dodonna allows the Rebel player to draw 4 faceup damage cards (when resolving critical hits on enemy ships) and choose which of the 4 effects to apply to the enemy. This may have huge gameplay ramifications since critical hits can be so nasty … or it might have minimal impact. When the cards comply, Dodonna can be devastating, but I personally prefer more dependable abilities.
CR90 Corvette: Man, is this ship a nasty little speed demon! With two Evade defense tokens, the CR90 can be surprisingly hard to pin down at long or even medium range. It’s Redirect token and a good spread of shields adds to that unexpected resilience. It also has only 1 Command, which allows it to respond very rapidly to changing battlefield conditions.
That being said, the CR90 will not last long in a straight up fight, particularly at close range, which is why the A-type is a worthwhile upgrade over the B-type. With long range red dice in each arc, the CR90 Corvette A can maximize the use of its maneuverability and evade tokens while still launching attacks at the enemy.
Nebulon-B: The two versions of the Nebulon-B (Escort and Support) have some striking differences in their capabilities. With wide side arcs and 2 blue attack dice against squadrons, the Escort can shred through TIE squadrons at a surprising rate, and its enhanced Squadron value of 2 allows it to activate 2 X-Wing squadrons at once. In contrast, the Support acts as a discount version of the Nebulon-B without these enhancements.
However, those side arcs present a glaring weak point. With only 1 side shield each and no Redirect tokens, the Nebulon-B can start taking hull damage very quickly. Its 2 Brace tokens do help mitigate that damage, but it still wants to engage other ships with its (very narrow) front facing and at long range, where it has a much beefier 3 shields, Evade token, and 3 red attack dice.
X-Wing Squadrons: The X-Wings are well-rounded when compared to the anti-squadron focused TIE Fighters. First, they come with Bomber, which allows them to resolve critical hits against enemy ships, significantly increasing their threat level. Their anti-ship attack also uses a red die, granting the potential to do double damage during a single attack.
Their second rule is Escort, which forces nearby squadrons to take out the X-Wings before dealing with anything else (for example Y-Wing or B-Wing Squadrons in the upcoming expansions).
X-Wings. Hard-hitting and versatile for only 13 points.
Luke Skywalker X-Wing Squadron: Luke has everything a regular X-Wing squadron has and more. When making a bombing run on an enemy ship, he is not to be underestimated because his attacks ignore enemy shields! This, coupled with the fact that he performs his anti-ship attacks with a black die gives him a high damage potential. And with 5 hull and 2 Brace tokens, Luke can weather a lot of firepower before he goes down.
All this for 20 points? Not too bad, I think.

SUMMARY

I had a ton of fun playing with the Core Set and will be collecting the Imperial faction for this game. I can’t put it any more simply than that. 🙂 Fantasy Flight Games has a great product here, and I am definitely looking forward to the Wave 1 releases, particularly those Gladiator-class Star Destroyers.
Check out the complete list of Star Wars: Armada articles here.

Filed Under: Games, Reviews, Star Wars: Armada Tagged With: Fantasy, Fantasy Flight Games, Science Fiction, Star Wars, Tabletop Games

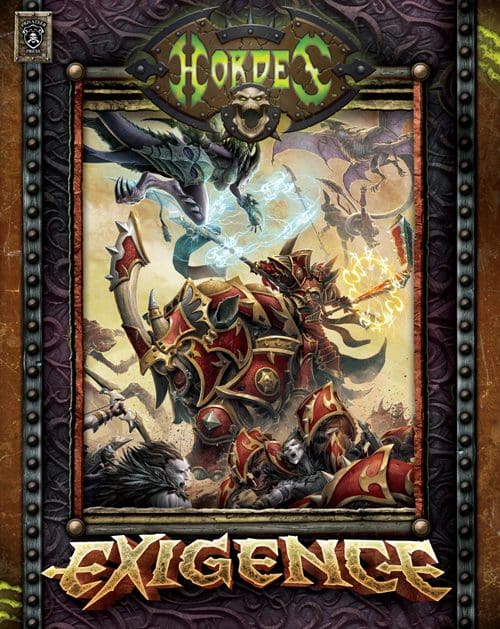
Hordes Exigence Review: Legion of Everblight

November 21, 2014 by holojacob 2 Comments

Hordes Exigence Rulebook Cover
IN SHORT: Hordes Exigence is here, so let’s take a look. As with previous releases, every Hordes army receives a host of new toys, this time throwing out powerful character warbeasts, lesser warlocks, and two of the new warbeast packs. Like all Privateer Press releases, the book is printed in full color with page after page of impressive new artwork.
So, let’s take a look at the new Legion of Everblight models.
ABSYLONIA, DAUGHTER OF EVERBLIGHT: Absylonia comes with plenty of ways to enhance Legion’s powerful arsenal of warbeasts. First, her warbeasts can charge or make power attacks without being forced. Second, if Absylonia kills something, those warbeasts get +2 SPD and +2 MAT. Third, her feat hands out +2 STR, Flight, and Reach to her battlegroup. Fourth, she can heal her entire battlegroup for d3+1 damage points at a cost of 2 Fury. That’s enough to guarantee every warbeast has every aspect active. Fifth, she can hand out Return Fire at 1 Fury per cast to allow her warbeasts to … return fire. Sixth, she can Fortify a model in her battlegroup with +2 ARM.
Oh yeah, Absylonia comes stocked with ways to make warbeasts an absolutely terror. She can also Teleport up to 8” away, which allows her to be played more aggressively, moving forward to get a kill in, then teleporting out of danger. She is an incredibly focused warlock, with basically nothing to give supporting infantry. But with a list of enhancements like the one above, why waste points on infantry?
BLIGHT WASPS: I tried. Honestly, I tried to figure out what these guys are good for. Blight Wasps are one of the two new warbeast packs, so they should be exciting, right? Well, not so much.
I mean, they’re not bad. I’m sure skilled players can put them to good use. They’re just underwhelming. There’s no wow factor here. Plus the Hunting Pack rule and Overwhelm animus don’t seem to mesh. Hunting Pack makes them a threat when they work together as a group, but Overwhelm can easily have them swinging bonus attacks at MAT 5 and P+S 8. Not exactly scary stuff here.
Meh.
NERAPH: This flying warbeast is fairly scrawny for a heavy warbeast and is instead geared to taking down high DEF enemies. A single hit with its Grasping Tail means every following attack automatically hits. After that, just keep headbutting the enemy with a P+S 16 Hammerhead. Plenty of light warjacks and warbeasts have very impressive DEF stats, but suffer with low ARM. The Neraph is an excellent counter to those models, and a flurry of P+S 16 attacks can certainly do work on tougher opponents.
ZURIEL: With a solid stat line, Flight, two P+S 16 daggers, and two spray attacks that set targets on fire, Zuriel means business! His Chain Attack allows him to get in a free spray if both his initial attacks hit the same target, and his animus is powerful when used right.
Predator’s Instinct is SELF only and costs 1 Fury. It gives Zuriel an additional die to all attacks against warrior models (excluding warlocks and warcasters). This allows Zuriel to tear through enemy infantry with ease using both spray attacks (RAT 5 with a bonus attack die should not be underestimated), but can also be used by numerous warlocks to great effect.
Given his affinities (Rhyas and Saeryn), he fits in well with both of them. He gets Stealth when with Rhyas and can channel spells for Saeryn.  But by no means do I think he should be restricted to their lists. Just imagine putting Predator’s Instinct on the Lylyth’s bow or Thagrosh’s spray attacks, just to name a few possibilities. Yeah, I think those combos would create quite the mess.
STRIDER BLIGHTBLADES: An ambushing unit for Legion? Apparently so!
The Strider Blightblades look pretty straightforward. Ambush allows them to enter the battle from the table side edges. They have high DEF and Stealth to help them survive long enough to actually do something, and they have Combined Melee Attack and two attacks each to give them some extra hitting power.
Like other ambushing units, you pay for that ability and suffer elsewhere in the unit’s capabilities. These blighted killers cost a point a model, so your mileage may vary.
FYANNA THE LASH: Okay, I have to admit something here. I really do like seeing models with varying attack types. I enjoy having that level of flexibility built right into the model’s rules, and Fyanna can execute three different attack types. She can beat enemies back 1” at a time, gain additional damage dies against warbeasts, or throw enemy models around. With Chain Strike and SPD 7, she has 14” threat range and can attack twice a turn. To keep her safe, she can Prowl in terrain to gain Stealth, is immune to free strikes, and gets a free 2” move when shots miss her.
That all pretty awesome. But is she 3 points worth of awesome? With only 12 ARM and 5 damage boxes? Umm … maybe?
SUMMARY: Privateer Press introduces another set of new models that bring fresh possibilities to each faction. Less warlocks and warbeast packs may not be as exciting as gargantuans, but there are still plenty of fun releases in this book.
Check out the complete list of Warmachine and Hordes articles here.

Filed Under: Hordes Tagged With: Exigence, Fantasy, Legion, Privateer Press, Review, Steampunk, Tabletop Games

Hordes Exigence Review: Skorne

November 20, 2014 by holojacob 2 Comments

Hordes Exigence Rulebook Cover
IN SHORT: Hordes Exigence is here, so let’s take a look. As with previous releases, every Hordes army receives a host of new toys, this time throwing out powerful character warbeasts, lesser warlocks, and two of the new warbeast packs. Like all Privateer Press releases, the book is printed in full color with page after page of impressive new artwork.
So, let’s take a look at the new Skorne models.
XERXIS, FURY OF HALAAK: Here comes Xerxis, back for more and riding a … rhinoceros … sort of thing. Whatever it is, it looks impressive.
Xerxis himself is fast and hard hitting. With SPD 7, MAT 8, and a P+S 15 weapon, Xerxis is hitting like a ton of bricks even before his special rules kick in. Add in cavalry charge rules, Brutal Charge, Ignite, then Mobility, and suddenly you have a 14”threat range with the first attack slamming home with effective MAT 10, P+S 19. That, I think, will leave a mark.
As a cavalry battle engine warlock, he comes with a long list of built in rules, some good, some not. His huge base is his main liability. Solid defensive stats help there, and he has access to the Basilisk Krea’s animus if more protection from shooting is required. In fact, the Krea’s animus goes very well with Xerxis regardless. Not only does it give him an extra +2 to DEF and ARM against shooting, but it also drops enemy DEF by -2 if they’re within 2” of him. Remember that huge base? Yeah, that’s a lot of tabletop he’s covering with that aura.
Oh, and Xerxis gets to cast an animus spell for free once per turn thanks to his Warbeast Bond with a warbeast in his battlegroup. Plenty of applications for this beyond the Krea too.
Xerxis is also a very warbeast-friendly warlock, despite his low Fury of 5. Mobility gives +2 SPD and Pathfinder to his entire battlegroup and his feat turns the entire tabletop into his control area, allowing warbeasts to be forced far afield if necessary while giving them an additional die for attack and damage rolls (dropping a die of the player’s choice).
Xerxis is a fairly straightforward caster, but he definitely looks fun to play. Who doesn’t like a speeding horde of Skorne titans led by someone riding a rhinoceros?
SCARAB PACK: Now here’s one of the two new warbeast packs, and an interesting one at that.
Scarabs have low base stats, but they also have a lot of rules and features that help them perform beyond their raw numbers. For example, they come with poor DEF and ARM stats, but also have a lot of hit boxes to soak up damage as well as the ability to Dig In for cover and eat enemy models for health. Same with their MAT and P+S. Not very impressive, but they have built-in ways to enhance them.
Also, with the number of attacks the pack can put out (along with buying additional attacks or boosting attack rolls), that Critical Paralysis becomes a lot more likely to land. All in all, a very interesting addition to Skorne, and definitely one I think is worth trying out.
ARADUS SOLDIER: With SPD 3, the Aradus Soldier is slow. However, a combination of Advanced Deploy and Reach give it surprising threat potential early in the game, and P+S 18 on its Mandibles is no joke. That’s even higher than a Bronzeback, and can easily be pushed up to P+S 20 with beast handlers. After all, this is Skorne we’re talking about.
The Mandibles don’t have Reach, but the attacks that do come with Pull to suck enemies in for those Mandibles. Also, good luck killing this guy with shooting. Its Carapace rule takes its base ARM of 19 and turns it into 23 against ranged attacks and free strikes.
A fairly interesting setup here. It has more of a defensive feel to it than other Skorne heavies. Once it gets somewhere, it’s going to be a pain to shift. Though, you still have to get it there.
ARADUS SENTINEL: Similar to the Aradus Soldier, the Aradus Sentinel has the same low speed, Carapace rule, and Advanced Deployment. What the Sentinel brings on top of this is a powerful AOE attack with Poison! And given its Carapace rule, it’s difficult to tie up. It can back away from being engaged, take its lumps with ARM 23, and keep firing. The Poison rule on its ranged attack makes it particularly effective against other Hordes armies.
By the way, this guy goes great with a Mortitheurge Willbreaker. Two Poison AOEs per turn? Yes please!
PRAETORIAN KELTARII: Here’s another flavor of Praetorians for Skorne, this one with some solid defensive rules. Blade Shield gives them +2 DEF against ranged attacks, bumping them up to a very respectable DEF 15 ARM 14 when shot at. Parry makes them immune to free strikes, and Reform gives them a free 3” advance at the end of the unit’s actions.
Throw in Combined Melee Attack for some harder hitting when needed, and you have a solid block of infantry that can easily rush in and jam up the enemy’s ranks or help screen friendly force. Overall, a nice new unit.
TYRANT ZAADESH: So here’s Skorne’s lesser warlock and immediately something is different. Unlike the other factions, Zaadesh has no restriction on what he can include in his battlegroup. He comes with a decent defensive ability in Protective Battlegroup (letting a warbeast he controls take a ranged or magic shot for him), and he enhances his battlegroup with Tag Team.
When active, Tag Team gives his battlegroup +2 melee attack and damage as long as the target is engaged by another member of the battlegroup. Zaadesh’s abilities mesh well because Protective Battlegroup and Tag Team both keep his warbeasts close. And it doesn’t take much to turn him into a nasty killing machine. With his warbeast(s) nearby, Zaadesh can hit at MAT 8, P+S 14 repeatedly until his Fury runs dry.
He can also be used as an animus battery, dishing out multiple copies of Sprint from an Archidon, just as an example. Or Rush from a Gladiator. Or … well, I think you get the point.
But yeah, I like this little tyrant.
SUMMARY: Privateer Press introduces another set of new models that bring fresh possibilities to each faction. Less warlocks and warbeast packs may not be as exciting as gargantuans, but there are still plenty of fun releases in this book.
Check out the complete list of Warmachine and Hordes articles here.

Filed Under: Hordes Tagged With: Exigence, Fantasy, Privateer Press, Review, Skorne, Steampunk, Tabletop Games

Hordes Exigence Review: Circle of Orboros

November 19, 2014 by holojacob Leave a Comment

Hordes Exigence Rulebook Cover
IN SHORT: Hordes Exigence is here, so let’s take a look. As with previous releases, every Hordes army receives a host of new toys, this time throwing out powerful character warbeasts, lesser warlocks, and two of the new warbeast packs. Like all Privateer Press releases, the book is printed in full color with page after page of impressive new artwork.
So, let’s take a look at the new Circle of Orboros models.
BRADIGUS THORLE THE RUNECARVER: Bradigus is a dedicated Construct warlock through and through, and boy does he bring the tools to get it done. First, all of his warbeasts (which must be Constructs) get a 1 Fury discount on their animus casting. Second, he can repair said Warbeasts d6 damage points with a skill check.
Synergize goes great with a healthy number of Woldwatchers, and allowing them to quickly boost melee attack and damage for the rest of the battlegroup. Rift gives Woldwardens an impressive 4” AOE spell to chuck out en masse.  The spell even leaves rough terrain behind as an added insult. And speaking of insult, this guy can shut down enemy casting, channeling, and upkeeping within 5” of his whole battlegroup. Ouch!
Now, Bradigus is on a large base and his defensive stats aren’t particularly stellar. However, this is a manageable problem. Between Woldwatchers soaking up hits for him and/or Bradigus using a Wold Guardian’s animus to reduce ranged damage, Circle players have the tools to keep him safe at range.
The biggest downside I see (more about the hobby than the gameplay) is that Bradigus doesn’t synergize well with the Woldwrath. Given what an awesome centerpiece model the gargantuan is, it’s a little sad to see how poor a fit it is for Circle’s new dedicated Construct warlock.
ARGUS MOONHOUND: Want to field a Circle army with lots of shooting? Well, here’s the warbeast for you! First, the Argus Moonhound can Mark Targets, granting other Circle models +2 to ranged attack rolls against enemies within 5” of him. He can also perform a special action that strips Camouflage and Stealth from those same nearby enemies. It’s a perfect one-two punch prepping the enemy for a rain of incoming fire.
With Pathfinder and SPD 7, the Argus Moonhound can easily reach those targets and get them ready for the incoming fusillade. All this for only 4 points? Not bad at all.
ROTTERHORN GRIFFON: Here’s another 4-point light warbeast, but one with wings and a more offensive tilt to it. The Rotterhorn Griffon’s most notable feature is its Shrill Shriek special action. This hits all models (friend or foe) within 2” of it with POW 8.
Okay, so it’s just POW 8. But, it auto-hits and it can potentially affect a large number of clumped up models. With average damage rolls, the Rotterhorn can take out ARM 14 models half the time. This guy is tailored for eliminating high DEF models, and most of those won’t have much armor.
BRENNOS THE ELDERHORN: Brennos is not meant to go toe-to-toe with enemy heavies. With low health, ARM, and really bad DEF for a Circle non-Construct heavy, he’ll get torn to pieces by pretty much any enemy heavy in the game. But that’s not why you’d take him. Instead, he’s meant to hang back and support the rest of the army, with the epic version of Morvahna being the clear favorite given his affinity for her.
Brennos can heal Morvahna when he kills something (preferably with his ranged attack!) or when he takes damage. Given how much of a yo-yo Morvahna the Dawnshadow’s health can be, these extra damage points can be a big deal.
With his 1-Fury animus, this character satyr can reduce the cost of friend warbeast animus casting by 1 Fury, as long as they’re within his 8” command range. Not bad. He can also cast those same animus spells himself. Sacred Ward helps keep him safe at range, and his ranged attack comes with d3” knockback and a critical knockdown.
All in all, Brennos brings some interesting tools for Morvahna’s game. Just make sure he doesn’t get obliterated before he can use them.
THE DEATH WOLVES: The main currency of this 3-model character unit is corpse tokens. They each start with one, gain one when they kill a living enemy model, and can spend those tokens for boosts, extra attacks, or to reduce incoming damage to 1 point. They also grant each other Overtake (for their PacMan impersonations), Prowl (to help keep them safe), and Gang (for some extra hitting power when they need it).
They’re a character unit that can absolutely mulch through living light infantry. Not exactly the most exciting of jobs. There’s plenty out there that can grind through living light infantry, but the Death Wolves do what they do very well.
UNA THE FALCONER: Una is a lesser warlock who likes griffons. Really, really likes griffons. In fact, if it can’t fly, she can’t take it. But if it can, she gets it for a 1-point discount (3-point Rotterhorns, anyone?).
That said, she doesn’t really bring much to the table to enhance those griffons. She also doesn’t come with much in the way of defensive abilities. Bird’s Eye allows her to see everything in her control area, so hiding her behind terrain doesn’t hinder her. With those two facts, I’m thinking Una and a single griffon (maybe two) is probably the best route to take.
With RAT 6, three boostable birds of prey to “fire” at the enemy, and clear line of sight within her (admittedly small) control area, she can provide some decent ranged support. And with Black Penny, she can fire into melee without penalty. Nothing too special, but not bad either.
SUMMARY: Privateer Press introduces another set of new models that bring fresh possibilities to each faction. Less warlocks and warbeast packs may not be as exciting as gargantuans, but there are still plenty of fun releases in this book.
Check out the complete list of Warmachine and Hordes articles here.

Filed Under: Hordes Tagged With: Circle, Exigence, Fantasy, Privateer Press, Review, Steampunk, Tabletop Games

Hordes Exigence Review: Trollbloods

November 18, 2014 by holojacob Leave a Comment

Hordes Exigence Rulebook Cover
IN SHORT: Hordes Exigence is here, so let’s take a look. As with previous releases, every Hordes army receives a host of new toys, this time throwing out powerful character warbeasts, lesser warlocks, and two of the new warbeast packs. Like all Privateer Press releases, the book is printed in full color with page after page of impressive new artwork.
So, let’s take a look at the new Trollblood models.
BORKA, VENGEANCE OF THE RIMSHAWS: Borka is back and he’s riding a bear! With solid offensive and defensive stats, Borka is all about getting in your opponent’s face and then pounding said face. His large base does bring the usual vulnerabilities, and his Fury stat is low, so he certainly isn’t without weaknesses. But what he really brings is ways to penalize an opponent’s aggression.
First, his spell Battle Charged grants his whole battlegroup Counter Charge, allowing them a free charge when enemies stop within 6” of them (with a few restrictions). Second, he also grants his battlegroup Immunity: Cold, which isn’t a big deal until you see his feat.
With Ice Storm, Borka gives his whole army Stealth (again a tool to deliver his army to the opponent’s face). That’s nice, but this feat’s kicker is when an enemy lands a melee attack against his Immunity: Cold model. They suffer Stationary! Warmachine and Hordes often comes down to whoever hits first and hardest. With Borka’s feat, he’s going to penalize the heck out of any army trying to strike before him.
Have fun!
DOZER & SMIGG: Start with a Dire Troll Blitzer and replace the gun with a powerful but inaccurate AOE attack. This character warbeast brings a lot of support to ranged troll armies. First, it grants friendly Blitzers +2 to all of their attack rolls while they can see Dozer & Smigg. Very nice! Second, its animus gives +2 to ranged attack rolls and also allows the deviation and / or distance of deviation to be rerolled. Third, if you take Dozer & Smigg with Gunnbjorn, then this warbeast gets boosted blast damage rolls, making its ranged attack even more interesting.
Taking Dozer & Smigg is kind of like taking Blitzer Premium Plus for ranged armies. By itself, it’s not super special. But put it in the right army, and that Premium Plus can be a game changer.
NORTHKIN FIRE EATERS: Sometimes I come across models that make me love this game even more.
So, the Northkin Fire Eaters come with what you’d expect from fire eating trolls. Namely, spray attacks that set people on fire. They also get +5 ARM when receiving fire damage, and actually power up when they’re burning (boosted attack and damage rolls, among other buffs).
So what can you do with this unit? Well, have one of the models set the other two on fire, of course! Then go to town with two fully boosted spray attacks.
I love this game.
TROLLKIN HIGHWAYMEN: A solid no-nonsense unit built around using combined ranged attacks or putting out an impressive number of shots (2 per model). They also come with Gunfighter so they can keep fighting with their pistols in melee, Camouflage to help keep them safe from enemy shooting, and Swift Hunter for a little extra mobility when they kill something.
A nice addition to the Trollblood arsenal.
HORGLE IRONSTRIKE: Horgle is a lesser warlock who focuses solely on Pyre Trolls and Slag Trolls. But that’s okay, because he makes both of them cheaper by 1 point and can enhance their ranged attacks with Hot Shot, granting boosted ranged damage rolls to one battlegroup warbeast.
Horgle can also team up with either warbeast and pump out multiple +2 melee damage buffs to nearby models. He’s no slouch in melee either, with easy access to those same buffs and a sword that inflicts Continuous Fire.
So, yeah. This is one solid lesser warlock.
BRAYLEN WANDERHEART, TROLLKIN OUTLAW: Braylen is a solo that comes with everything the Trollkin Highwaymen have, only better. Better guns, better stats, better defensive abilities, and so on. With Luck, she can reroll misses for her twin POW 12 heavy pistols, and with Gun & Run, she can kill something and then back away to safety.
She’s also an Opportunist, granting additional attack and damage dies when in something’s back arc, and she grants this ability to Trollkin Highwaymen that can see her. Definitely worth consider alone or with a posse of Highwaymen.
SUMMARY: Privateer Press introduces another set of new models that bring fresh possibilities to each faction. Less warlocks and warbeast packs may not be as exciting as gargantuans, but there are still plenty of fun releases in this book.
Check out the complete list of Warmachine and Hordes articles here.

Filed Under: Hordes Tagged With: Exigence, Fantasy, Privateer Press, Review, Steampunk, Tabletop Games, Trollbloods

Warmachine Tactics – Cryx: Goreshade, Lord of Ruin

June 24, 2014 by holojacob 4 Comments

34106_GoreshadeLordofRuin_WEB_0
Warcasters are the stars of Warmachine, and Cryx has no shortage of powerful and fun-to-play warcasters. Today, I’m taking a look at Goreshade, Lord of Ruin.
IN SHORT: With two ways to inflict Stationary, some excellent buff spells, and a cheap way to bring back undead models, Goreshade is a force to be reckoned with. Did I mention he’s got a horse now too?
STRENGTHS: Where to begin with this guy?
How about, he’s a warcaster with Ghostly and cavalry rules. What does this mean? Well, for starters, no one’s getting free strikes against him, even if he misses impact attacks or performs a ride-by attack. That’s a chocolate and peanut butter combo if I ever saw one.
He’s also Tall in the Saddle, so he can ignore small and medium bases when making melee attacks. So forget about typical Shield Wall units preventing line of sight to a vulnerable warcaster when declaring a melee attack.
And while we’re on it, what a melee attack! His sword Voass is P+S 15 with Reach and Stationary. Even better, he’s effective MAT 9 when he charges (again because of those delicious cavalry rules). And after he’s hit once, every extra attack hits automatically.
So, a quick recap. No one gets free strikes against him. He can trample through enemy models. He hits like a truck, freezes enemies solid, and then is free to dish out hit after hit with impunity. That is an assassination vector opponents MUST respect!
But Goreshade is far from a one trick undead horse. He comes with a whole host of ways to support his army. Infernal Machine buffs one of his warjacks. +2 SPD and MAT on a Kraken anyone? Occultation gives out Stealth to units or models (potentially to himself for added safety). And Scything Touch enhances melee damage by +2, again to units or models.
For his feat, Winter’s Grasp, he can explode his own warrior models into 3” AOEs. And what do these AOEs do? Well, they inflict Stationary! He can literally freeze an enemy army dead in its tracks.
But the real gem in his spell list is Mockery of Life. For the cheap price of 2 Focus, Goreshade can bring back a friendly Faction Undead Grunt. Now, Cryx infantry does not lack for ways to increase its numbers. When combined with Goreshade’s new spell, this can get outright silly. Be sure to bring extra models!
He can even cast a spell for free once per turn if a living enemy model casts a spell in his control area. That gives him 4 potential Mockery of Life casts! I mean, seriously, even his basic magic attack spell is snazzy. With Siphon Bolt, he can strip 1 Focus or 1 Fury off models hit and add 1 Focus to his own pool, kind of making this a 1 Focus attack spell. Yikes!
Rounding out the package, Goreshade’s basic stats are solid. With DEF 14, ARM 17, Focus 7, and 17 hit boxes, so he can take a solid beating before going down.
Yeah, Goreshade comes fully loaded.
WEAKNESSES: Goreshade is sitting on a large base, which automatically makes him difficult to protect. He also has three upkeep spells and Mockery of Life vying for his Focus pool. Put those two together, and it’s easy to splurge and leave him vulnerable.
Ghostly and SPD 8 do help him use terrain to his advantage, and he can slap Stealth on himself for added protection, but the problem definitely exists.
Goreshade also lacks the conventional assortment of Cryx debuffs. While Scything Touch does aid damage output, Goreshade has very limited options when it comes to making Cryx models hit better. This mostly revolves around using his feat to inflict Stationary. Models that like DEF debuffs for more accurate attacks won’t find much support from this warcaster.
SYNERGIES: Goreshade loves undead infantry so he can bring them back with Mockery of Life, and that synergy is even better if those models can already add to their numbers.  And if those models are self-sufficient, it gets even better.
For all of the above, Bane Thralls or Bane Knights with Tartarus provide an excellent option. For most of the above, Mechanithralls supported by Necrosurgeons do the trick.
Blackbane’s Raiders are also a potent choice. They’re undead and they can reanimate their enemies as long as Blackbane is around. But they’re also incorporeal with SPD 7, which allows them to race through the enemy lines and be detonated by Goreshade Stationary-inflicting AOEs. For this same reason, Machine Wraiths are an excellent vector for delivering Goreshade’s feat to enemy models.
Bane Riders are another choice with plenty of promise. They may lack a way to add more Riders, but they are highly self-sufficient when it comes to hitting their targets hard and accurately, plus each Rider that Goreshade revives packs considerable punch. Better than bringing Mechanithralls back for 2 Focus a model, right? Their large bases also provide a means to block line of sight to Goreshade.
JUST FOR FUN: It’s the Mechanithrall two-for-one sale! Enemy gun lines getting you down? Mechanithralls lying around in pieces? Well, have no fear!
With both Necrosurgeons and Goreshade on hand, each blown up Mechanithrall can come back not once, but TWICE! That’s because the Necrosurgeons and Goreshade both use a different resource to add models (a corpse token versus a destroyed status).
So yeah. Double-dip till your heart’s content. Even blow up some of your own Mechanithralls to get the process started.
Enjoy!
SUMMARY: Goreshade is back and comes loaded with cool tricks and abilities. He’s a powerful assassin all by himself, and he can play a downright demoralizing attrition game with Mockery of Life. Plus, it’s a steampunk undead dark elf on a steampunk undead horse! Do I really need to say anything else?
Check out the complete list of Warmachine and Hordes articles here.

Filed Under: Warmachine Tagged With: Cryx, Epic Goreshade, Fantasy, Goreshade, Privateer Press, Steampunk, Tabletop Games

Warmachine Vengeance Review: Cryx

April 16, 2014 by holojacob 2 Comments

warmachine vengeance cover
IN SHORT: Warmachine Vengeance has arrived. Let’s dig in. As with previous releases, every Warmachine army gets a healthy heaping of awesome, this time with an emphasis on speed with exciting cavalry units and mobile warcasters. It also ushers in an interesting cast of journeymen warcasters. The book is printed in stellar full color with plenty of gorgeous new artwork.
Let’s take a look at the new Cryx models.
GORESHADE, LORD OF RUIN: Goreshade’s back and he’s on a horse! Of course, that puts him on a large base, but he’s well equipped to handle that. DEF 14, ARM 17, Focus 7, 17 hit boxes. Plenty of raw defensive power there. He also has access to Occultation to give a model or unit Stealth, including himself. Ghostly lets him ignore terrain and free strikes. And, of course, Cryx has no shortage of arc nodes at its disposal if he wants to hang back a bit.
Goreshade doesn’t have any debuffs, but that’s okay. He comes with two excellent buffs in the way of Scything Touch (+2 melee damage for a model or unit) and Infernal Machine (+2 MAT, +2 SPD, and Terror for a battlegroup warjack). Both are excellent spells. Still, he’s going to favor units that are self-sufficient when it comes to hitting their targets, since he lacks a DEF debuff.
For getting into melee, he has an impressive linear threat range. SPD 8 plus Reach lets him stab targets 13” away. And when he is stabbing, it’s with a P+S 15 sword that inflicts Stationary. He also can cause Stationary with his feat, Winter’s Grasp. Friendly warriors in his control area can be made to explode into 3” AOEs that freeze enemy models not immune to cold. And after he’s spent models in this manner, he can bring them back with Mockery of Life.
Goreshade also comes with two abilities that help with Focus efficiency. Spell Vortex lets him cast a spell for free if a living enemy model casts a spell in his control area last turn. His attack spell, Siphon Bolt, can strip Focus or Fury off the target one point per hit and give Goreshade a point of Focus in return.
All in all, a very exciting and flexible new caster. Can’t wait to try him out.
INFLICTOR: Do my eyes deceive me? A Cryxian heavy with Shield Guard and ARM 19 thanks to its shield? Wow! At 8 points, the Inflictor is an excellent option for many Cryx warcasters. On average, our warcasters can be quite greedy with their Focus. But, they also have these warjack points we need to spend. Well, have no fear! Put those points towards an Inflictor, and let it tank hits meant for the warcaster or squishy solos.
Its stinger may only be P+S 16, but that’s plenty of punch for Cryx since we have so many options for stripping ARM off our targets. And it even comes with a Soul Drive to give it one point of Focus for free every turn. Awesome. Just awesome.
BANE RIDERS: ARM 18 heavy cavalry? Yes, please!
Don’t let the lack of Weapon Master deceive you. These banes hit hard! With base P+S 13 and Brutal Charge, they slam home with 15+3d6 on the charge. Their mounts are also a hefty POW 12, great for impact attacks. They may not be as fast as some of the other cavalry in this rulebook. But when you combine SPD 7, Ghostly for ignoring terrain, Curse for an extra 2”, and Reach on their melee attacks, their natural threat range is nothing to ignore.
They’re also very self-sufficient. Per cavalry rules, they automatically get +2 to their attack rolls on the charge. Toss in Curse, and suddenly they’re at effective MAT 10! Yikes! Bane Riders definitely operate at their peak when charging.
And let me just say we finally have a unit worthy of putting Death Ward on. ARM 20 banes on horses anyone?
SKARLOCK COMMANDER: Here’s a unit attachment for Mechanithralls or Bile Thralls. For only one point, this guy is not bad at all. It’s always annoying when my Mechanithralls get hit with a nasty debuff. It doesn’t happen super often (I’m normally the one doing the debuffing, not my foe), but spending one point on an attachment that can clear those debuffs is handy. The extra bit of CMD is also a nice boon, though the model doesn’t have any rules to help keep him safe.
Still, The Skarlock Commander has a decent set of offensive abilities with Dark Fire, Battle Wizard, and Soul Taker. These can combine for a surprisingly powerful offense. First soak up some souls with kills from the attached unit. Then stab something in melee (boosting with souls if needed), then cast Dark Fire for free thanks to Battle Wizard (again, boosting with souls).
For only one point? Yeah. Not too bad.
AIAKOS, SCOURGE OF THE MEREDIUS: The Cryx journeyman warcasters comes loaded down with awesome sauce. First, he’s going to be hard to pin down with Stealth, DEF 14, and ARM 19 if he’s camping with Escort active. Second, he’s fast with SPD 6 and Jump for an additional 5” placement. Escort also gives +2” to his warjack, which is just lovely when added to the already speedy Cryxian warjacks.
And he also comes with the Deathbringers spell, which allows Aiakos and his battlegroup to ignore Tough and damage transfers. Against Hordes, that’s brutal!
But wait! There’s more! He also comes with Drag to reel in enemies. His harpoon may only have RAT 5, 6” RNG, and POW 10, but he’s got the Focus to boost those rolls when needed. There are plenty of exciting combos with this guy. Too many to count.
Aiakos, ladies and gentlemen. I have a feeling we’ll be seeing a few more warjacks in Cryxian lists thanks to this guy. Finally!
Time to dust off my Leviathan.
SUMMARY: Privateer Press continues to release new and exciting models for each of its factions, ensuring that whichever army you play, you keep getting new options to bring to the tabletop. All in all, Vengeance is great release for a game that keeps getting better.
Check out the complete list of Warmachine and Hordes articles here.

Filed Under: Warmachine Tagged With: Cryx, Fantasy, Privateer Press, Review, Steampunk, Tabletop Games, Vengeance

  • Page 1
  • Page 2
  • Page 3
  • Interim pages omitted …
  • Page 7
  • Go to Next Page »

Footer

Grab Some Free Books!

Thanks for swinging by our humble corner of the Internet. If this is your first time visiting our site – here, sign up and have some free reads on us!

Sign Up Now!

Copyright © 2025 · Powered by ModFarm · Log in

We use cookies to ensure that we give you the best experience on our website. If you continue to use this site we will assume that you are happy with it.Accept